

How To Repair Main Electrical Undergrou Nd Consduit
Fix Underground Wiring
Updated: Jun. xxx, 2022
Make a splice that will last longer than the wire

Accidentally cut an clandestine electrical wire? The easiest manner to repair it is with an underground splice kit, which uses a rustproof connector to repair and seal the break.
Y'all might also like: TBD
Appraise the damage
If you're excavation holes in your lawn, you lot should e'er phone call 811 a few days beforehand to mark all the underground utilities. Unfortunately, privately owned wiring will not exist marked, so it's however possible to strike an electrical cable. It's specially likely if y'all're excavation between the house and a freestanding garage, shed or one thousand light. If yous practise cut a power line, though, it's easy to fix. Here's how.
First plow off ability to the electrical device fed by the broken cable at the circuit console. And then dig 12 in. on each side of the pause in the wire and gingerly work your mode to the cable. Y'all'll notice the cable anywhere between 12 and 24 in. deep. When you locate the cable, use a noncontact voltage detector to ensure at that place's no power.
If you have a broken hole-and-corner line and no clue where the break is, rent an electrician with an underground open/brusk locator. The electrician will be able to locate and mark the underground cable, determine how deep the cable is buried and pinpoint within a few inches where the problem exists.
Two Splice Kits
Underground AC splice kits come in two varieties: heat-shrinkable tubing and gel-filled shield. Both utilize a brass splicing block to connect the wires. But they differ in how they protect the splice.
The most common blazon of kit protects the splice with an eight-in. length of heat-shrinkable tubing filled with watertight hot-melt adhesive. (The Gardner Bender HST-1300, available through our affiliation with Amazon.com, is shown here). Slide the tubing over the cable before you connect the wires to the splice block. Then slide the tubing over the connector and shrink it with a heat gun (best) or a torch (gently!). The other type is a corrugated plastic shield filled with an encapsulating gel. (The Tyco Electronics PowerGel WrapAround UF Splice Kit, likewise available through Amazon.com, is one brand). Information technology's twice the price, but it installs much faster, is goof-proof and is very long lasting.
Heat-shrinkable tubing repair

Clandestine connector
Utilize a splice block to fix a severed cablevision.

Photograph 1: Join the wires
Insert the wires into the splice block connectors, making sure the colors match up, and then tighten the screws.

Photo ii: Seal the connectedness
Slide the heat-shrink tube over the connector. Use a heat gun to shrink information technology and seal the connexion.
Replace the whole section of cable that yous dug up with the same gauge UF (underground feeder) cable. Cut the cable well-nigh 12 in. on either side of the break. Then strip dorsum the sheathing two in. and the wire insulation five/8 in. Use ii special cloak-and-dagger splice kits (sold at home centers) to connect the new cablevision section. Slide the rut shrink tube over one finish of the cable, then connect the wires to the brass connector (Photo 1). Practice this on both ends of the new cable. Once the damaged cable is replaced and the wires are joined with connectors, slide the heat-shrink tube over each connector (Photo 2). Estrus the tube with a heat gun until it shrinks tight on the connector and sealant bubbling out the end.
Gel-filled splice kit repair

Photo one: Twist and pull to separate
Grab each of the side conductors with pliers. Then twist your hands in reverse directions to start the tear. Pull the conductors 180 degrees abroad from each other to divide and expose a length of i-1/2 in. Strip 3/4 in. of insulation off the black and white wires.
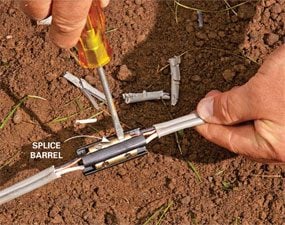
Photo 2: Match the colors and splice
Slide the black wires into opposite ends of the brass barrel and tighten the screws. And so practise the same for the white and blank copper wires.

Photo 3: Position the splice on the shield
Place the splice block dead-center over the gel-filled shield. Clean off whatsoever droppings that may have fallen into the gel. Then press the splice into the gel.
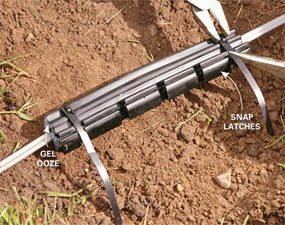
Photo 4: Roll and snap
Ringlet the shield around the splice and align the plastic latches. Snap the latches, starting at the middle and working toward the edges. Then install the zip ties and tighten with pliers.

Photo v: Marker the location
Tie vivid-colored surveyor's tape around the splice and fill up the pigsty with soil. Supersede the grass and trim the tape at soil level so you tin can find it again.
Start by cutting out the damaged sections. Then cut, separate and strip the ends of the buried cable (Photo i). Practise the same for the additional section of cable (if needed). Next, secure the wires in the brass holder (Photo 2). Locate the splice block in the protective shield (Photo three). Wrap the shield effectually the splice and secure it (Photograph 4). Then repower the excursion to brand certain the splice works.
To make it easier to locate the splice in the future, mark it with bright-colored surveyor'due south tape (Photo v). Then refill the hole.
Splicing Depression-Voltage Cable
Likewise underground power cable, it's also possible to slice through depression-voltage lighting, irrigation and telephone cable and coaxial cable. Since they're low voltage, you may be tempted to just twist the wires and wrap the splice with electric tape. Information technology won't piece of work. Instead, head to a domicile center and get a couple of low-voltage connectors for direct burial. They rely on gel to encapsulate the splice to prevent h2o intrusion and corrosion.
For low-voltage stranded cablevision, like you lot might notice on lighting, use the wire nut/gel-filled tube style. Twist on the wire nut, plunge the connector into the tube until the gel oozes out the top, then snap the chapeau. For solid irrigation and telephone wire, shove the wires in an insulation piercing gel-filled connector and snap it closed.
Required Tools for this Projection
Accept the necessary tools for this DIY project lined up before you lot start—y'all'll save time and frustration.
You'll as well demand a oestrus gun for the rut-shrinkable tubing.
Required Materials for this Project
Avoid last-minute shopping trips past having all your materials ready ahead of time. Here's a list.
Originally Published: June twenty, 2022

Source: https://www.familyhandyman.com/project/fix-underground-wiring/
Posted by: lealayed1960.blogspot.com
0 Response to "How To Repair Main Electrical Undergrou Nd Consduit"
Post a Comment